How to make a baby print. Master class on how to make hand and foot prints of your baby as a keepsake. How to dry salt dough
Sometimes it seems that children grow up too quickly, parents don’t have time to enjoy communication with their worries, and the awe they feel when looking at their children’s little hands and feet slips away. I really want to leave something in my unreliable memory so that it reminds me of the baby and demonstrates the miracle of the baby’s growth. Photographs and plaster casts of palms help partly.
Photo by Shutterstock
Making plaster casts is not difficult, the only problem is that babies are mobile, getting your palm to apply the right amount of force at the right moment and not bringing the baby to tears is really difficult. Little secrets come to the rescue.
Option one - economical
You will need: - soft plasticine, - oilcloth, - Vaseline, - plaster, - a glass of water.
Cover the table with oilcloth, otherwise you risk spending the rest of the day cleaning. From plasticine (take a couple of pieces at once), mold a cake at least 3 cm thick. It should be smooth and without holes. Apply a thick layer of Vaseline to one of the surfaces of the cake; you can even use Vaseline oil.
It is not at all necessary to use plaster; foot prints on plasticine look no less cute
In a bowl, dilute a bag of medical plaster (sold in pharmacies or by weight, or packaged in 150 grams), pour it into a glass and gradually pour in 200 ml of warm water. Stir constantly to avoid lumps. Cover the glass with a lid.
Now put the finished plasticine in the microwave for 10-15 seconds, so it will become very soft and pliable. Check whether the mass is too hot and whether the baby’s hands will be burned.
Let your baby “drown” his hand or foot in the mass of plasticine. This must be done quickly and clearly; the child must not have time to clench his fingers or twirl his palm in the warm mass. Feel free to take out the handle; the plasticine should not stick, because it has a layer of Vaseline on it. To be on the safe side, you can smear your baby’s hand with baby fat cream.
Pour the prepared plaster into the resulting cavity and leave the mold for 2–3 hours. Once the plaster has dried, you can remove the plasticine. Dry the plaster for another day, now you can file off the unevenness of the plaster using sandpaper. Cover the cast with paint; acrylic or meat paint work well. All that remains is to place it in a deep frame, even without glass.
Option two - home
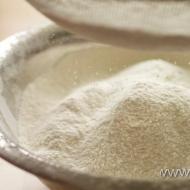
Make salt dough impressions. Knead 2 cups of flour with 1.5 cups of warm water in a bowl, add 1 cup of fine salt. To make the dough soft and smooth, you can squeeze half a tube of baby cream into it.
Sometimes there is a need to quickly and easily make a high-quality cast of something. There is neither the money nor the desire to buy special and sometimes very expensive materials, and that’s when ingenuity and minimal knowledge of chemistry come to our aid. We will tell you how to prepare a mixture using available materials to take a high-quality impression with a good degree of detail.
Impression material:
To begin with, you should clearly understand that impressions and, accordingly, impression masses come in a variety of forms. For example, there are special impression compounds for taking impressions from the human body - they are harmless (almost harmless), and there are impression compounds for taking impressions of keys, etc. Try to use them for their intended purpose, the described recipe is suitable for inanimate, relatively solid objects , keychains, coins, medallions...
In order to make the casting compound you will need only two ingredients: ordinary silicone sealant (I used clear silicone sealant for sewer pipes) and potato starch.
 Figure No. 1 – Starch and sealant
 You need to mix starch and sealant one to one in a deep, convenient container (a disposable plastic cup will do). You simply pour starch into a container (you determine the amount yourself, depending on your needs) and squeeze the silicone into it. Now take a spoon and start stirring it all continuously. I warn you! The mass must be mixed very thoroughly. At first the mixture is very sticky and viscous, but after twenty minutes it becomes empty and becomes like dough (plasticine), while the silicone no longer sticks to your hands or anything.
 Figure No. 2 – The mass no longer sticks to your hands
 Now all you have to do is apply your mixture to what you want to make an impression of, and wait until it hardens. The advantage of this method is that there is no need to use a release agent since starch prevents the silicone from sticking. And the mixture quickly hardens, turning (I put it on the radiator and it was ready within an hour) into a reusable rubber mold with which you can easily make plaster casts and other products.
The easiest and cheapest way is to print with any paint on paper. It’s better to take finger paints or watercolors, apply them to an arm or leg, and put an imprint on a landscape sheet. Then you can beautifully design the free space around the print. To prevent the sheet from fraying over time, it is better to laminate it and only then put it in a frame.
Plasticine prints
There is another simple way to make an imprint: buy modeling clay or modern plasticine (the one that dries itself in the air) at any store. Choose the color you like best. You need to take the mass and flatten it into the desired shape, and only then press well with your handle or foot. Don’t forget to make a hole for the ribbon so that you have something to hang your “home heirloom” from later. Leave the workpiece overnight and it will dry.
Homemade salt dough print
This type of printmaking is more labor-intensive, but the result will be more interesting.
For the test we need: 1 cup flour, 1 cup salt, 2 tbsp. sunflower oil and 0.5 - 1 tbsp. water. Knead the dough. Let it sit for half an hour, maybe in the refrigerator.
- Knead the dough, roll it into a ball, then roll it out with a rolling pin, about 1.5 - 2 cm thick;
- Take some foil, place a piece of dough on it and chill the dough in the refrigerator;
- Lubricate the baby’s hand (leg) with sunflower oil and press it into the dough;
- Don't forget to make a hole in the dough for the ribbon so that the finished “work of art” can be hung;
- If you are satisfied with the print, it should be left to dry for 2-3 weeks;
- After about a week, you can turn it over, carefully removing the foil;
- When the print is dry, paint it with acrylic paints.
Salt dough cast
This type of cast making is also quite painstaking. For it we need salt dough, plaster, acrylic paint. Make the dough according to the recipe given above.
Take a larger lump of dough so that the imprint is deep. We print a handle or leg on this lump of dough. We take plaster. You need to dilute the plaster in a ratio of 1/3 gypsum to 2/3 water. To begin with, we dilute a little plaster and lubricate the contour with a brush and leave for 10 minutes so that the plaster dries. Next, prepare the second part of the plaster and fill the print to the edges. Leave to dry for 15 minutes.
When the plaster dries, you will need to bend the soft dough. Do this very carefully so as not to damage the impressions. The remaining pieces of dough on the casts must be carefully removed. That's it, now you can start coloring!
Sand casts
Sand casts look very beautiful and creative. We will need: sand, plaster, frame.
- We take dry river sand and sift it through a sieve;
- Then the sand needs to be moistened, add a little water to it;
- We take a mold (frame) and fill it with wet sand, then make an imprint in it (spread your palm and press lightly on it);
- Then take the plaster. It is necessary to dilute the gypsum in the following ratio: add 2/3 water to 1/3 gypsum;
- Fill the mold with plaster on top and leave until hardened;
- Shake off the remaining sand and your sand print is ready!
Casts from creative kits
If you do not want to spend a lot of time studying the issues of making impressions, then purchase a ready-made one. With it you can even make a baby's fist. In such kits, everything is already included in the kit and you just need to follow the step-by-step instructions.
What to give your grandmother for March 8th? Gifts from grandchildren are the most expensive, so grandmothers will be happy about everything. It is especially important that the baby takes part in preparing the gift. Today I want to offer one of these gifts and I’ll show you how to make it salt dough for baby's footprint.
When I saw this idea for the first time, it captivated me. No, it’s not new, but the simplicity of its implementation immediately prompted the desire to repeat it for myself. I hope it inspires you too.
Necessary materials
- salt– 1 glass
- flour– 1 glass
- water– 1/2 cup
- rolling pin for rolling out dough
- kitchen knife
- acrylic paint
- tassel for drawing
How to make footprints on salt dough
1. Prepare salt dough
Mix salt (1 cup), flour (1 cup) and water (1/2 cup). Mix everything well to form a homogeneous dough.
The child can also help in this process. He will really enjoy kneading the dough with his little fingers.
2. Cut out the heart
Roll out the dough with a rolling pin to make it plate approximately 1.5-2 cm thick.

Cut out the heart
Place the heart on a baking sheet. I also lined it with baking paper, but this made the bottom of the heart uneven. It would probably be better to just put it on a baking sheet without paper.
I would be glad to hear your comments on this matter if you repeat the idea.
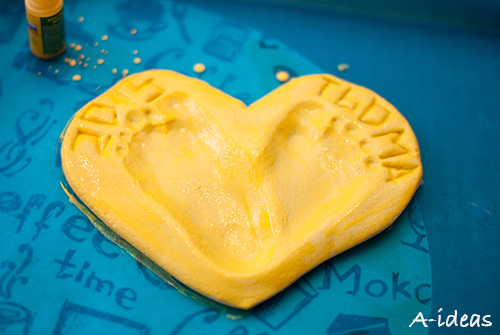
3. Foot prints
With bare children's feet we make an imprint on the heart.

Footprints
We got it right the first time. Although the child practically does not stand still, in those seconds that we need to leave an imprint, he stood still, enthusiastically watching the process.
Using a spoon, make an inscription on the heart.
4. Baking in the oven
Preheat the oven up to 100 degrees and place a baking tray with a footprint for baking for 3 hours.
5. Paint the footprint
After I took the print out of the oven, I let it cool down for a while and then carefully separated the baking paper.
The original recipe says that you can paint the heart almost immediately, but I have it it sat for a couple more days.
For painting I took acrylic paint. It dries quickly.
Painting the footprint
First I painted one side, and at the end of the day I painted the other.

Painting the footprint
You can also involve your child in this process. Even if it turns out less neatly, the main thing is the process. I haven't decided on this yet. We are now at an age when a child wants to do everything himself, he would not let me help, and at some point he himself could simply drop and break our print.
I am very pleased with the result. Only now you need to find deep photo frame to put our gift in it.
I didn't make a hole for hanging on purpose. The heart turned out to be not very light and could simply not withstand its weight, fall and break.
Please leave your review or comment. I'm very interested in your opinion!
Do you want to make your baby's childhood memories even more amazing and vivid? Kits for making children's three-dimensional casts and prints will help parents with this. The little hands and heels of newborns are so appetizing and beautiful that you want to remember them in the smallest detail.
Hands and feet of babies, we have already told you. Now let's talk about how you can design them in an original way.
Framed
Framing casts of children's hands and feet is a classic of the genre, but this in no way detracts from the charm of the manufactured souvenirs. There are single, double and triple frames on sale, with or without photos - it all depends on your wishes. You can make a frame with your own hands. In addition, you can add a frame with a cast or print in a variety of ways.

Use rhinestones, flowers, butterflies and other decorative delights.


Add a pacifier, socks, booties or other keepsakes.


Color the prints in any shade - pink, blue, gold, silver, bronze.


Pendants
When making casts or prints of palms and heels, if you make a small hole in them and thread a satin or lace ribbon through it, you can get an elegant pendant. This decor will look great in a children's room, living room or parents' office.


Figurines
To make a cute figurine, you just need to place the resulting 3D plaster casts on a platform and cover with paint. It is important to let them dry thoroughly before and after applying a decorative coat of paint. You can apply paint in several layers, and also use contrasting shades. Any ideas - the possibilities for creativity are unlimited. How to color? It all depends on your wishes - choose golden or silver decor, antique or, on the contrary, fashionable and bright shades?


How to decorate a figurine? Add a little chic - rhinestones, beads, flowers or any other decorative elements.


Heart shaped
Plaster prints or casts designed in the shape of a heart look very graceful. To add more chic to such souvenirs, you can use gold and silver dyes. And of course, don’t forget about a memorable signature with the name and age of the little child.


Articles on the topic