Cream cheese for red velvet cake. Red velvet cake
“Red Velvet”, an incredibly delicate and chic cake, will decorate the festive table. However, this American dessert is a holiday in itself. It is very unusual - snow-white on the outside, but striped in the cut. The bright red sponge cake is especially surprising!
"Velvet" biography
The history of the Red Velvet cake begins in the 19th century, although the dessert acquired its current color in the 40s of the last century. Interestingly, the cake “turned red” completely by accident as a result of a combination of unsweetened chocolate, natural cocoa powder and fermented milk drink. Later they began to tint it with artificial dyes or, as was the case during the Great Depression, using beets. However, the rebirth of “Red Velvet” occurred after the release of the film “Steel Magnolias” in 1989, where this dessert appeared as a wedding cake in the shape of an armadillo. Now “Red Velvet” is the favorite delicacy of all American sweet tooths.
"Red Velvet": brief instructions

If you make Red Velvet Cake according to the original recipe, you must make a multi-layer cake with a dough of butter, eggs, buttermilk, cocoa, flour and beets, which can be replaced with coloring. The cakes are coated with butter cream, and the top of the cake is covered with cream or cheese glaze. Modern versions of the cake look a little different. Instead of buttermilk, kefir is quite suitable, and butter can easily be replaced with vegetable oil. By the way, special gel dyes for desserts provide a brighter and more saturated color. Regular food coloring or beets cannot cope with this task.
Red velvet cake is soft, moist and spongy, so it doesn't need to be soaked in syrup. You coat, decorate, let the cake brew and soak, and then serve. That's all the instructions!
Several secrets of velvety

If you are making the cream with cream cheese, take it out of the refrigerator just before whipping - this will make the cream much fluffier. It is best to use mascarpone cheese as its velvety texture is perfect for this dessert. But do not beat the cheese and cream for too long, otherwise the cream will separate. Butter and eggs should be at room temperature, but it is better to cool the cream.
After the cakes are baked, trim their edges - this way, when assembled, the cake will look more neat and impressive. The scraps can be shredded and sprinkled over the top cake after frosting.
American confectioners recommend keeping the baked cakes in the refrigerator and only then covering them with cream and icing. The fact is that on warm cakes the cream and glaze spread, but it becomes soggy and loses its airiness. These unpleasant moments can be avoided by pre-cooling the cake before assembling.
Cooking "Red Velvet"

If you want to treat yourself to another sweet delicacy, think about Red Velvet. Of course, you will have to tinker, but for the sake of such beauty you can do anything! Look for simpler red velvet cake recipes before mastering the more complex versions.
First, mix the dry ingredients - 475 g flour, 25 g cocoa powder, 10 g baking powder, 4 g baking soda and 2 g salt. Now combine and stir 365 g of kefir and 10 g of gel dye.
Beat 155 g of soft butter and 220 g of sugar with a mixer for 1 minute, add 75 g of refined vegetable oil, 10 g of vanilla essence and another 220 g of sugar. Add 3 eggs to this oil mixture and beat again until fluffy.
Mix the resulting dry and liquid mixtures, you should get a homogeneous mass.
Line the pan with oiled baking paper and spoon out one third of the dough. Bake the cake for half an hour at 180°C. Make 3 cakes and cool them on the table. Be sure to trim any rising tops to ensure an even and neat cake.
Whip 410 g of cream 33%, gradually adding 355 g of Philadelphia cheese. Assemble the cake by sandwiching each layer with cream and coating it on all sides with cream.
Decorate the delicious dessert with sponge crumbs and place the cake in the refrigerator for 4 hours. You can also sprinkle the cake with chocolate chips and sprinkles. Enjoy!
Beetroot miracle

Even though beets do not produce as bright a color as dye, they are often used in making the famous cake. And we offer you a recipe with a photo of a Red Velvet cake, where the sponge cake is tinted with beetroot juice. Try it - you won't regret it! The dosage of products is given per serving. It turns out to be quite a large and delicious cake.
Bake 180 g of beets in foil at a temperature of 200 ° C - this will take you about 50 minutes. Grind the peeled beets with a blender, add raw egg yolk, a third of a teaspoon of grated ginger and the zest of 1 orange, which can be easily removed with a grater. Place the egg white in the refrigerator. Pour 2 tbsp into beet puree. l. orange juice and 20 ml of olive oil, add 40 g of corn flour and mix the mass well. Add 2 tbsp to the dough. l. honey and 1 tsp. Sahara.
Now, soak up a third of a teaspoon of soda with orange juice and add it to all the ingredients. If you can squeeze a little more juice out of the orange, add that too. Beat the cooled egg white and carefully fold into the dough. Place it in a greased pan and bake for 30-50 minutes at 190°C.
While the sponge cake is cooling, prepare a cream from 100 g of any curd cheese, 50 ml of natural yogurt, 3 tbsp. l. sugar and a pinch of vanilla. Soak the cake with syrup made from 20 ml espresso coffee and 10 ml cognac. Grease it with cream and cut into 3 parts.
Place the cream in a pastry bag fitted with a plain round tip and pipe small portions between the cake layers. Top with cream and fresh berries and cool the cake in the refrigerator. An exquisite dessert for tea party is ready! In the section you will see red and white stripes - everything is as it should be!
A simple recipe for lazy velvet

Try making Red Velvet Cake from Philadelphia cheese using a simple recipe for lazy housewives, and the recipe is written almost step by step.
Add 1 tsp. soda in 280 ml of kefir and mix well. Let it sit for a while and pour in 300 ml of vegetable oil.
Beat 3 eggs with 300 g of sugar into a fluffy foam and add 2 tbsp. l. red food coloring, liquid or gel.
Mix 340 g flour with 2 tsp. baking powder and 1 tbsp. l. cocoa, and then pour into kefir and stir well.
Divide the dough into 2 parts and bake 2 biscuits in turn at 170 ° C for 50 minutes.
The cream is easy to prepare - beat 250 g of butter with 70 g of powdered sugar, and then pour in 2 tbsp. l. milk. Add 260 g of Philadelphia cheese and beat everything with a mixer at low speed.
Lightly trim the cooled cakes on top, cutting off the protruding lumps, and cut into 3 layers. In total you will get 6 cakes. Spread the cream over the cake layers and sides of the cake, and then sprinkle the dessert with biscuit crumbs.
Don't eat right away, let the cake soak and enjoy it with your loved ones. Such beauty cannot be eaten alone.
You will probably be surprised by the manic precision in the recipe. Why 365 g of kefir, and not 370 g, or 410 ml of cream, and not 400 ml? Because Red Velvet recipes are quite complex, every gram counts. At least, this is how it is customary among professional confectioners. And the results will delight both you and your loved ones!
A cake made from bright red cake layers covered with white cream. Thanks to this contrasting combination of white and red, the dessert looks original and appetizing.
Here are some simple recipes for the American dessert.

I'll start with the most common "classic" recipe. The following ingredients will be required:
For the test:
- 4 medium sized eggs;
- 30 g cocoa;
- 450 g flour;
- 400 ml high quality vegetable oil;
- 370 g kefir;
- quarter tsp food salt;
- 400 g sugar;
- 2.5 teaspoons baking powder;
- 1.3 teaspoons of soda (can be heaped);
- 2-3 teaspoons of dye.
For cream:
- 300 grams of cream with a fat content of 33-35%;
- 400 grams of curd (cream cheese);
- powdered sugar (to taste).
How to cook:
- First I prepare the biscuit. I mix eggs with sugar using a mixer (without separating the whites and yolks). Can be done manually using a whisk. As a result, the mass should thicken and be homogeneous.
- I pour kefir into another container, add soda and also stir thoroughly.
- After baking soda, I add dye in gel form. Stir until a uniform shade is obtained. The recipe indicates the approximate amount of dye. In any case, the cakes should be red, and choose the degree of color intensity yourself.
- After the dye I add oil. I use only high quality products.
Important! The oil should have no taste or smell!
- In a separate container, thoroughly mix the pre-sifted flour, cocoa, and baking powder. Then I add salt.
- I combine the dry mixture with the egg mass and add the mixture with kefir dye. Beat with a mixer until smooth.
- In this way I make all 4 cake layers. For baking I use 2 molds with a diameter of 20 cm each. Be sure to put down some pastry paper.
- I bake the shortcakes for 40 minutes at a temperature of 180 degrees. I check the degree of readiness with a regular toothpick, carefully piercing the dough. If the stick is dry, the cakes are ready.
- I wait for the baked goods to cool completely and then cut each cake into two more equal parts. I do the same with the 2nd one. In total - 4 cakes.
Now all that remains is to prepare the cream:
- I whip the cream with a mixer.
Important! The cream should be cold.
- I mix the powder and cream cheese and beat.
- Little by little add the whipped cream into the cream cheese and stir gently.
The cream is ready. Now I’m assembling the cake into one “design”:
- I place the cake on a plate. I apply cream on it. The cake does not need additional impregnation, since the baked goods themselves are soft and tender.
- I spread it evenly and lay out the next layer, apply the next portion.
- I repeat the procedure until the very last cake. On the 4th step I apply the remaining cream, after which I level it both on the sides and on the surface.
- I decorate the top with fresh berries and sprinkles.
I put the dessert in the refrigerator for a couple of hours. Perfect for a festive table in a large company or just for tea in a modest family circle.
The recipe will appeal to those who prefer to use natural ingredients. Here, instead of the usual carmine dye, beets are used.

Ingredients:
- wheat flour from 150 to 200 g;
- cocoa powder 3 tbsp. spoons;
- a pinch of salt;
- sugar – from 200 to 250 g;
- baking powder - teaspoon;
- butter – 100 g;
- a pair of large eggs;
- beet;
- 1-2 eggs (3 are possible, if not large);
- 1 raw beets (~200 g);
- kefir – 100 ml;
- apple cider vinegar - a couple of tbsp. spoon;
- pomegranate sauce - tbsp. spoon.
For the cream you will need:
- mascarpone - 200 gr;
- powder or sugar - 2-3 tbsp. boats;
- beet juice - a couple of teaspoons (depending on the desired color intensity).
How to cook:
- I turn on the oven at 180 degrees to warm up. At the same time, I make puree from fresh beets, chopping with a grater.
- I add vinegar, lemon juice and pomegranate sauce. Stir until the mixture has a homogeneous consistency. I remove it to let it brew.
- Mix flour and cocoa, adding baking powder and salt.
- Place slightly melted butter and sugar in a deep container. I'm whipping it up.
- Gradually add eggs and mix with a mixer.
- I pour in kefir and a dry mixture of flour and cocoa powder.
- Now I add beet juice, squeezing it carefully into the container with the dough.
- I pour the dough into the molds, only half way, and put it in the oven. Maximum cooking time is 45 minutes.
The cakes are ready and now all that remains is to cool them. To prepare the cream, mix mascarpone with sugar or powder. I beat the mixture to an airy consistency. I distribute it evenly over the cakes, thoroughly coating them on all sides.
Here's another delicious recipe using mascarpone as one of the main ingredients.

To prepare the biscuit you will need:
- 115 g butter;
- 300 grams of granulated sugar;
- a pair of large eggs;
- 120 grams of kefir and cream with a fat content of 33%;
- teaspoon red food coloring;
- 250 grams of wheat flour;
- half a teaspoon of soda;
- teaspoon baking powder;
- 15 grams of cocoa powder.
How to cook:
- I melt the butter on the stove, just a little, with the addition of sugar. I take out kefir, eggs, cream in advance.
- Beat eggs in a separate bowl.
- In another container I combine the dry ingredients: baking soda, baking powder, cocoa, flour. Then I pour in the cream along with the coloring agent and kefir. I stir thoroughly constantly.
- I pass 1⁄2 of the dry mass through a sieve, adding it to the mixture of eggs and sugar, and whisking at low speed.
- I pour in the kefir-cream mixture and mix thoroughly again.
- I sift the remaining amount of dry mixture into the bowl, kneading completely.
- I proceed directly to the baking process: into the prepared pan, greased and sprinkled with flour, I pour the dough not to the edges, but to half of the pan.
- Baking at a temperature of 180 degrees takes about 20 minutes, no more.
- I take out the baked goods and cool them.
While the cakes are cooling, I make a delicate cream. Required:
- 240 mascarpone and cream cheese;
- 120 grams of powder;
- 60 grams of cream, fat content from 33 to 35%.
Important! All ingredients for the cream must be cold.
Preparation:
- I combine the cheeses, powder and beat at low speed.
- Pour in the cream and beat until medium thick.
The cream is ready. I apply it to the cooled cakes in the same way as the previous recipes: in layers, thoroughly coating on all sides.
How to bake red velvet in a slow cooker - step-by-step recipe

There is a modern recipe for making a cake in a slow cooker. I do not use this household appliance. I know that many people can’t do without it and even use it for baking. I present a recipe specifically for those who cook in a slow cooker.
Ingredients:
- 170 g flour;
- 150 grams of granulated sugar;
- a pair of eggs;
- 150 ml vegetable oil, kefir;
- Art. a spoonful of baking powder;
- 1⁄2 tbsp. spoons of cocoa;
- a quarter teaspoon of salt;
- vanillin;
- dye;
- 1⁄2 teaspoon of soda;
- cherry syrup.
For cream:
- 350 grams of Philadelphia cheese;
- 400 g 33% cream;
- 140 grams of powder;
- 10 grams of vanillin.
So, how to prepare Red Velvet in a slow cooker:
- Carefully sift the flour, add cocoa and vanillin. A little salt and baking powder. At the very end is sugar.
- Then add butter and eggs.
- Separately, add dye to kefir and mix until uniform color and consistency.
- They bring in soda. Beat with a mixer at low speed.
Important! A prerequisite for the test: it must be very liquid.
Remove the dough for 15-20 minutes so that the soda reacts with kefir. This time is enough.
- The inside of the multicooker is greased with oil, after which the dough is poured in.
- Cook in the “Baking” mode for 45 minutes.
While baking the cakes, prepare the most delicate curd cream:
- Beat the chilled cream with sugar using a mixer.
- Stir the cream cheese to an airy consistency, then add it to the cream.
- The cream should be thick enough. Can be placed in the refrigerator to cool.
The finished biscuit is first cooled and then removed from the multicooker. Cut into shortcakes. Lubricate each cake well with cottage cheese cream, placing one on top of the other. The top is optionally decorated with “delicious” decorative elements. For example, pieces of marmalade, fruit, berries, sprinkles.
Delicate, airy, velvety and delicious Red Cake – Video recipe
Red velvet cake recipe from Julia Vysotskaya
Classic American Red Velvet at home
I present the American version of the Red Velvet dessert.

The following products will be required:
- 340 g flour;
- Art. l. cocoa;
- quarter tsp salt;
- 300 grams of sugar;
- a couple tsp vanillin;
- 260 grams of cheese (cream);
- tsp soda;
- a couple tsp baking powder;
- 280 ml kefir 1%;
- 300 ml sunflower oil;
- 3 eggs;
- 250 g butter;
- 5 grams of dye.
How to cook:
- I beat eggs with sugar. The mixture should increase in volume and turn white.
- I add coloring and whisk again.
- In another container I mix soda and kefir. You need to wait until the substances react and the kefir starts to foam a little.
- Pour in sunflower oil and whisk.
- Separately mix cocoa, baking powder, flour, salt.
- Gradually add flour to the egg-sugar mixture and beat with a mixer.
- Add 1⁄2 kefir mixture and beat until a thick dough is obtained.
- I bake two equal sized cakes at 180 degrees for 45 minutes.
I take the finished shortcakes out of the oven and cool them in the refrigerator.
Attention! Before putting the sponge cake in the refrigerator, wait 15-20 minutes to allow the cakes to cool properly. You can't clean it while it's hot!
I continue cooking: now comes the delicious cream cheese cream. Simply delicious. Beat vanilla, powder, and cream cheese together until a homogeneous consistency is obtained.
After an hour of keeping the cakes in the refrigerator, I begin assembling the dessert, one by one lubricating them with cream. First I divide each cake into two. The result is four.
The cake is ready. All that remains is to decorate. For this version, I prefer sugared cherries and red coconut flakes.
You can come up with your own design method.

Another red velvet dessert recipe, only without using eggs. Some people prefer to cook according to it. I tried to cook it once, I liked it.
For the test you will need:
- 50 grams of butter;
- a can of condensed milk;
- 250 ml water or milk;
- 250 g flour;
- Art. spoon of cocoa powder;
- dye;
- teaspoon of soda;
- ½ teaspoon of citric acid.
For cream:
- 150 g butter and cheese (cream)
- from 100 to 150 grams of powder.
How to cook:
- I start cooking with the dough. To do this, take 50 grams of butter at room temperature and beat with a mixer.
- Add condensed milk and continue beating until fluffy.
- I gradually add milk and whisk again.
- Lastly, I add the dye.
- Next, I start mixing the dry ingredients: cocoa, flour, soda, citric acid.
- I combine the liquid and dry ingredients and mix gently with a whisk.
- I preheat the oven to 180 degrees. Pour the dough onto a baking sheet. It is very important to distribute the dough evenly. Baking time – 20 minutes.
While the cakes are cooling, I prepare the cream:
- The butter should be at room temperature while whipping.
- Add Philadelphia cheese (chilled).
- I add powder.
- I beat all the ingredients with a mixer.
In this version, I use a pastry bag to apply the cream.

There is another delicious version of red velvet cake using berries. At the same time, you can choose absolutely any berries that you like or make an assortment of berries.
For the cakes you will need:
- butter – 115 g;
- sugar – 300 gr;
- a pair of chicken eggs;
- kefir or sour cream to choose from – 120 g, the same amount of cream (33%);
- teaspoon of dye;
- wheat flour – 250 gr;
- half a teaspoon of soda;
- including a boat of baking powder;
- cocoa powder – 15 gr.
How to cook:
- Combine melted butter with sugar. I beat with a mixer at low speed.
- I add the eggs to the mixture and stir the contents thoroughly.
- In a separate container, mix the dry ingredients: cocoa, soda, baking powder, flour.
- At the same time - in another container - I combine kefir with dye and cream, add eggs.
- To the egg-sugar mixture, I first add the flour mixture, and then the kefir mixture.
- Lastly, add the remaining flour.
I knead the resulting dough well. Once the dough has become homogeneous, you can start baking the cakes. I set the oven, as usual, at 180 degrees. At this temperature, 15 to 20 minutes are enough for the baked goods to be ready.
While the shortcakes are cooling, I prepare the cream. To prepare you will need:
- mascarpone cream cheese - 240 g each;
- cream with fat content 33% - 360 g;
- powdered sugar – 120 gr.
It’s very simple to prepare: I mix both types of cheeses with powder, gradually pouring in the cream. At the very end, you can increase the speed of the mixer. The mixture should be thick.
Now the main point is assembling and decorating the cake. To do this, I take one cake layer, carefully coat it with cream, top it with the next one, and so on. I decorate the dessert with fresh berries and remaining powdered sugar.
The cake turns out very tasty and nutritious, you'll just lick your fingers!
This version of making a cake is one of my favorites. The combination of cream and cheese creates a soft and delicate consistency that is simply irresistible.

Biscuit ingredients:
- 360 g flour;
- 250 g kefir;
- a pair of eggs;
- 390 g sugar;
- 220 g butter;
- Art. a spoonful of baking powder;
- 12 g cocoa;
- dye.
For cream:
- 90 grams of butter;
- 200 grams of Philadelphia and 250 grams of Mascarpone;
- 100 grams of powder;
- Art. spoon of vanilla.
How to cook:
- Grind sugar and butter in a separate container.
- Add the eggs and continue mixing.
- I add kefir.
- In a separate container, combine the dry ingredients (flour, cocoa, baking powder).
- I combine the mixture of kefir, cream and eggs with dry ingredients, mix thoroughly so that there are no lumps. At the very end I add dye.
- I bake the resulting dough in 2 layers at a temperature of 150 degrees. It takes 45-50 minutes to be ready.
- I take out the finished cakes and cool them. You can wrap it in a special food film and put it in the refrigerator for a while.
While the cakes are cooling in the refrigerator, I start creating the cream. You will need vanillin, powder, both types of cheese and butter. I mix everything well and beat with a mixer. The light, airy cream is ready.
I take the cakes out of the refrigerator and spread thick cream on each one. I put it in the refrigerator overnight. This will make the dessert more delicious.
That's all the recipes for a delicious, airy dessert that I wanted to tell you about. I'm glad if any of them, or maybe several at once, will be useful to you.
Cook with love, because cooking is a creative process!
Irina Kamshilina
Cooking for someone is much more pleasant than for yourself))
Content
Red velvet cake is considered a real culinary masterpiece. It is prepared as a wedding dessert, served on Valentine's Day, but it will also be good as a decoration for the festive New Year's table. Its description is impressive - the top is covered with chocolate glaze, and the cross-section reveals layers of red-brown cake layers with creamy cream cheese.
How to make red velvet cake
Making a red velvet cake is difficult because you need to maintain the right balance of ingredients, make the cake layers correctly and layer them with cream. Decorating the cake will also not be easy for novice cooks - evenly coat the surface with glaze and cream, sprinkle with sponge crumbs and decorate with strawberries and grated white chocolate.
Red velvet cake is considered very popular in America, but in Russia it is also beginning to gain leadership positions. It has a rich chocolate flavor that is hidden behind a bright red cake layer that is spongy and moist. The secret of taste lies in a small amount of cocoa and butter cream with mascarpone cheese inside the filling. Cake decoration can be different - icing or sponge crumbs.
Korzh Red velvet
The most important component of the dessert is the secret of how to make red velvet cakes. For them you will need to mix dry products with wet ones. The raw acid base is sour cream, kefir and vinegar. Next you will need to beat the butter and sugar to a thick white cream, add coloring and flavorings. You can tint the cakes with gel food coloring or natural beet juice. Vanillin and vanilla sugar are suitable as flavoring agents.
Beat the eggs into the sugar-butter mixture and add the dry base - flour, which must be thoroughly sifted, soda and cocoa. All that remains is to add the sour base and beat the dough with a mixer at low speed. For taste and tenderness, cocoa and buttermilk are added. You can take it ready-made or prepare it yourself - ferment a glass of milk with a tablespoon of apple cider vinegar or lemon juice for 10 minutes. All that remains is to bake the cakes, cool and put them together. The cake is prepared like a layer cake - coat each layer with filling and let it soak.

Red Velvet Cake Recipe
It's not easy to get a red velvet recipe right the first time, but it is possible. Beginning cooks will need a recipe with photos that will help them complete all the steps correctly and without errors. You can find a step-by-step recipe for Red Velvet Cupcake in publicly available sources. Housewives should bake this delicacy at least once to surprise guests and family members. A classic cupcake recipe from Yulia Vysotskaya or Gordon Ramsay is suitable for the holiday.
Red velvet cake at home
- Cooking time: 2 hours.
- Number of servings: 10 persons.
- Calorie content of the dish: 358 kcal.
- Purpose: for dessert.
- Cuisine: American.
It will not be easy to repeat the red velvet cake recipe step by step at home, but if all conditions are met, you will get a spectacular delicacy. Everyone without exception will like it - guests, family members and the hostess herself. Juicy red cakes with snow-white cream icing will look very appetizing, bright and attractive. No one will refuse the supplement.
Ingredients:
- flour – 300 g;
- sugar – 300 g;
- cocoa – 15 g;
- eggs – 3 pcs.;
- butter – 300 g + 110 g for cream;
- vanilla sugar – 5 g + 10 g for filling;
- kefir – 280 ml;
- dye – 2 ml;
- lemon juice – 20 ml;
- cream cheese – 0.3 kg;
- powdered sugar – 150 g.
Cooking method:
- Make buttermilk from kefir and lemon juice, cooled for 10 minutes after mixing.
- Beat the butter with a mixer, add both types of sugar, add eggs, and color. Add buttermilk, flour, cocoa.
- Preheat the oven to 180 degrees, grease the pan with butter or line it with baking paper. Pour half the dough, bake for half an hour, cool. After 10 minutes, make the second cake layer, wrap both in film and refrigerate for an hour.
- Cut both cakes in half, coat with cream of beaten cheese, butter, powdered sugar and vanilla sugar. Coat the surface with cream and let it soak.

Red velvet cake - original recipe
- Cooking time: 2 hours.
- Number of servings: 10 persons.
- Calorie content of the dish: 360 kcal.
- Purpose: for dessert.
- Cuisine: American.
- Difficulty of preparation: difficult.
For experienced home cooks, it will not be difficult to prepare the original Red Velvet Cake, which is prepared in many American families. The step-by-step recipe involves using certain products that are not always available in regular stores, but can be ordered in specialized departments. If desired, cream cheese can be replaced with full-fat sour cream mixed with cream.
Ingredients:
- unsweetened chocolate – 85 g;
- granulated sugar – 400 g;
- eggs – 4 pcs.;
- vegetable oil – 300 ml;
- vanilla – 1.5 tsp;
- flour – 400 g;
- soda – 2.5 tsp;
- salt – 3 g;
- beets – 340 g;
- food coloring – 10 ml.
For cream:
- heavy cream - 2 cups;
- cream cheese – 340 g;
- mascarpone – 340 g;
- vanilla extract – 5 ml;
- powdered sugar – 300 g.
Cooking method:
- Heat the oven to 250 degrees. Boil the beets and make a puree.
- Melt the chocolate.
- Mix sugar, eggs, butter, vanilla with a mixer, beat at low speed. Add a mixture of flour, salt and soda, pour in melted chocolate, beetroot puree, and coloring.
- Divide into 3 layers, bake each for 25 minutes, cool in the pan for 10 minutes, and cool on a wire rack until ready.
- Make the cream: cool the cream, whip until stiff, add whipped cream cheese with mascarpone. Season with vanilla and powdered sugar.
- Coat the cakes with cream and decorate the surface.

Red velvet - a classic recipe
- Cooking time: 5 hours.
- Number of servings: 10 persons.
- Calorie content of the dish: 369 kcal.
- Purpose: for dessert.
- Cuisine: American.
- Difficulty of preparation: difficult.
Classic Red Velvet is made according to the approved composition: with cheese cream, mascarpone and many creamy ingredients. It turns out very sweet, but not cloying, so the cake is pleasant to serve with tea, coffee or cocoa. It is worth surprising the gathered guests with a culinary masterpiece, because the entire appearance of the dessert speaks of its original taste and exquisite aroma.
Ingredients:
- cream 35% fat – 3 cups + 225 ml for dough;
- mascarpone – half a kilo;
- powdered sugar – 150 g;
- sugar – 450 g;
- cocoa powder – 60 g;
- salt – 5 g;
- soda – 15 g;
- baking powder – 30 g;
- eggs – 5 pcs.;
- vegetable oil – 450 ml;
- sour cream 20% fat - jar;
- red dye – 10 g;
- flour - half a kilo.
Cooking method:
- Sift the flour, add sugar, cocoa, salt, soda, baking powder.
- Add eggs, butter, cream, sour cream, coloring. Mix with a mixer for 4 minutes.
- After 20 minutes of infusion, pour into a baking dish on top of parchment to make 3 cakes.
- Bake at 180 degrees for half an hour. Wrap the cakes in film and refrigerate for 2 hours.
- Make the cream: beat the chilled cream with a mixer at minimum speed until stiff peaks form, gradually add powdered sugar and warm mascarpone. Refrigerate for 4 hours covered with film.
- Cut off the top-tubercle from the biscuits, fold the cakes in layers, brushing with cream. Coat the surface, sides, decorate with biscuit crumbs.

Red Velvet Cake by Gordon Ramsay
- Cooking time: 1 hour.
- Number of servings: 10 persons.
- Calorie content of the dish: 430 kcal.
- Purpose: for dessert.
- Kitchen: author's.
- Difficulty of preparation: difficult.
The famous chef and restaurant owner Gordon Ramsay offers his step-by-step home recipe, according to which Red Velvet sponge cake is prepared much faster than the classic version. Otherwise, it is no different from the traditional one - buttermilk, butter and soft cheese are used. If desired, it can be made with mastic, but then it will take more time.
Ingredients:
- sugar – 300 g + 400 g for cream;
- vinegar – 10 ml;
- refined sunflower oil – 300 ml;
- soda – 10 g;
- eggs – 2 pcs.;
- vanillin – 20 g;
- cocoa – 40 g;
- buttermilk – 200 g;
- flour - half a kilo;
- red culinary pigment – 20 ml;
- cream cheese – 230 g;
- butter – 200 g.
Cooking method:
- Heat the oven to 160 degrees.
- Beat sugar, eggs, vegetable oil, food coloring.
- Separately mix all the dry ingredients except baking soda and vinegar.
- Gradually add the dry substance with buttermilk to the butter mixture, whisking thoroughly.
- Grease a baking dish with butter and sprinkle with flour. Add baking soda slaked with vinegar to the dough.
- Pour the dough into 3 cake layers. Bake every half hour, cool.
- For the cream, beat together the cheese, butter and vanilla.
- Grease the cakes and let them soak.

Red Velvet Cake by Andy Chef
- Cooking time: 3 hours.
- Number of servings: 10 persons.
- Calorie content of the dish: 353 kcal.
- Purpose: for dessert.
- Kitchen: author's.
- Difficulty of preparation: difficult.
Another incredible Red Velvet Cake is offered by Andychef, a food blogger and chef who is popular with many culinary experts. His recipe is not easy, but it reveals the secrets of how to bake a cupcake that melts in your mouth. Such food is good to serve on a big and magnificent holiday, so that guests appreciate the delicacy and remember it with a pleasant smile.
Ingredients:
- flour – 340 g;
- sugar – 300 g;
- cocoa – 20 g;
- salt – 3 g;
- baking powder – 20 g;
- eggs – 3 pcs.;
- vegetable oil – 1.5 cups;
- buttermilk – 300 g;
- gel dye – 20 ml;
- cream cheese – 200 g;
- mascarpone – 0.2 kg;
- powdered sugar – 0.2 kg.
Cooking method:
- Mix flour, sugar, cocoa, salt, soda, baking powder. Add eggs, butter, beat.
- Add buttermilk with dye, mix with a mixer. After 20 minutes, bake 3 cakes at 170 degrees. Baking time – 20 minutes. Cool.
- Make the cream: beat the cream cheese, cake cheese and powdered sugar until it forms a thick white substance.
- Grease the cakes, decorate with chocolate chips and red berries if desired.

Red velvet cake with beets: recipe
- Cooking time: 2 hours.
- Number of servings: 4 persons.
- Calorie content of the dish: 338 kcal.
- Purpose: for dessert.
- Kitchen: author's.
- Difficulty of preparation: difficult.
For those who are wary of using food coloring, try Red Velvet Cake with Natural Beetroot Juice. A dessert without dye can also be made for a children’s party, because it is better for a child to do without “chemical” components in any dish so as not to cause allergies. Natural beet juice mixed with pomegranate sauce will add color to the cakes.
Ingredients:
- raw beets – 175 g;
- lemon – 1 pc.;
- white wine vinegar – 40 ml;
- pomegranate sauce – 30 ml;
- flour – 150 g;
- cocoa – 75 g;
- baking powder – 10 g;
- salt - a pinch;
- butter – 100 g;
- sugar – 200 g;
- eggs – 2 pcs.;
- kefir – half a glass;
- mascarpone – 200 g;
- powdered sugar – 40 g;
- beet juice – 15 ml.
Cooking method:
- Heat the oven to 175 degrees. Finely grate the beets, mix with lemon juice, vinegar, and pomegranate sauce.
- Add cocoa, baking powder, and salt to the flour. Separately, beat warm butter with sugar and eggs.
- Pour kefir in parts, add flour mixture, beat until smooth.
- Add beets, bake 2 cakes for half an hour. Cool.
- Cover with a cheese glaze made from whipped mascarpone, beet juice and powdered sugar.

Red velvet cake in a slow cooker
- Cooking time: 3 hours.
- Number of servings: 10 persons.
- Calorie content of the dish: 368 kcal.
- Purpose: for dessert.
- Cuisine: American.
- Difficulty of preparation: medium.
For those who do not have an oven, it will be useful to know how to prepare Red Velvet in a slow cooker. This universal device will become an assistant in any task, even in baking cakes. The advantage of using a multicooker is that there is no time tracking - you just need to wait for the sound signal and take out the finished semi-finished products. All that remains is to soak the cakes in cream and serve.
Ingredients:
- creamy cottage cheese - a glass;
- butter - half a glass;
- sugar – 400 g + 300 g for dough;
- vanilla extract – 10 ml + 15 ml for dough;
- cocoa – 40 g;
- vegetable oil - half a glass;
- eggs – 2 pcs.;
- salt – 10 g;
- flour - half a kilo;
- yogurt - a glass;
- dye – 10 ml;
- white vinegar – 10 ml;
- soda – 10 g.
Cooking method:
- Beat butter and sugar until fluffy. Add eggs, coloring, cocoa, vanilla extract for dough, salt.
- Add flour in small portions alternately with kefir and slaked soda.
- Divide the mixture into 2 layers. Bake each on the baking setting for 50 minutes. Cool for 20 minutes on warm mode.
- Cover the cakes with a frosting made from whipped cottage cheese, butter, sugar and vanilla extract.

Red Velvet Cream
An important component of the dessert is the red velvet cake cream. Here are several options for making it:
- mascarpone, butter, vanillin, powdered sugar;
- ricotta, liqueur, almonds;
- soft cottage cheese, white chocolate, cinnamon.
Video: Red Velvet Cake
Red velvet cake – taste reviews
Irina, 37 years old The first time I baked a Red Velvet cake was on February 14th to surprise my beloved husband. We both liked it so much that dessert became my signature dish. All guests like its juicy sweetness, chocolate taste and spectacular combination of cakes and cream.
Marina, 29 years old In one of the restaurants I was attracted by the festive dessert Red Velvet, and after trying it, I fell in love. I tried to repeat it at home, but I didn’t know how to decorate it - proven recipes from chefs helped. I love the exquisite taste of the delicacy.Found an error in the text? Select it, press Ctrl + Enter and we will fix everything!
Red Velvet cake is a true masterpiece of confectionery art, which has been known to the world for a long period. At first glance, one might get the impression that such a product can only be prepared by a professional master with a lot of culinary experience behind him, however, this is not at all the case. "Red velvet" is a cake that even a novice housewife who is not familiar with all the intricacies of cooking and confectionery can prepare - it will require a small amount of patience and attentiveness to the cooking process itself.
Story
The history of this elite culinary masterpiece dates back to the 19th century, when residents of European countries already knew about the existence of the original red sponge cake. At that time, it was considered a royal dessert, the taste of which amazed all those who tried it. According to another version, the history of the Red Velvet biscuit recipe dates back to the Great Depression, known to the US population. At that time, the demand for food decreased significantly, as a result of which one confectionery decided to attract the attention of customers with an unusual red dessert.
This cake first received its name in 1972, its author was the American confectioner James Beard, who became the author of the original color of the sponge cake, obtained by combining vinegar with sour buttermilk. This operation of removing the special red hue of the biscuit is called Dutch by the culinary specialist.
At the moment, there are a considerable number of recipes for this dessert, which are used by many confectioners. All of them are good in their own way, and the cakes made using them have an original look and a savory taste that appeals to millions of sweet tooths.
So, how to bake red velvet cake? What features does this process have? More on this below.

Taste qualities
Many people really like the unusual appearance of such a cake, but what does a Red Velvet sponge cake taste like?
This confectionery product has a rather delicate taste with unobtrusive chocolate notes. In addition, after tasting such a dessert, the sweet tooth will feel the pleasant creamy taste that the cream has for a long time.
Thanks to the large number of moisture-retaining ingredients, the sponge cake that forms the basis of this confectionery product is quite wet and juicy, as a result of which its classic recipe does not even require impregnation.
Biscuit ingredients
- 250 g wheat flour;
- 120 g butter;
- 1.5 cups sugar;
- 3 eggs;
- a glass of low-fat kefir (can be replaced with buttermilk);
- 2 bags of vanilla sugar (10 g each);
- 2 tbsp. l. cocoa powder;
- 1 tsp. soda (previously slaked with table vinegar);
- 1.5 tsp. red food coloring;
- 0.5 tsp. salt.
Stage 1. Preparation
Before you start preparing the red velvet chiffon sponge cake, you need to sift the amount of flour indicated in the list of ingredients. The baking dish chosen for baking also needs to be prepared - it should be covered with parchment and greased with a piece of butter. Also at this stage you should turn on the oven and, choosing a temperature of 180 degrees, leave it to warm up.
Stage 2. Dough
The sifted flour should be salted and cocoa powder should be added to it, which should not be sweet. In a separate bowl, you need to prepare the creamy mixture, for which the butter is first whipped separately using a mixer until it breaks into small lumps, and then the specified amount of sugar is added there and the procedure is repeated. The red velvet cake recipe recommends doing this on low speed. While beating, add chicken eggs into the mixture and gradually bring the contents until smooth. If the mass turns out fluffy and as homogeneous as possible, the cake will turn out right, very beautiful and tasty. As soon as the mass becomes fluffy, you should gradually add flour and cocoa into it, doing this in small portions to avoid the formation of unwanted lumps.
Without stopping the beating process, you should add pre-prepared food coloring to the dough, which should be diluted in kefir (or buttermilk). This should be done in a thin stream so that the dye is evenly distributed throughout the dough.
Some chefs recommend adding kefir and flour alternately, after dividing these ingredients into equal two or three parts. That is, you can first add a third of the flour with cocoa, then pour in half of the kefir or buttermilk, then add the flour again and alternate this way two more times. By following this recommendation, you can achieve the perfect silkiness of the finished dessert, which is an indicator of the culinary skill.
At the very last stage of preparing the dough, without stopping the mixer, you should quickly add soda slaked with vinegar to the dough (you can also use lemon juice for this purpose).

Stage 3. Baking
All those who know how to make red velvet sponge cake recommend using round molds with a clamp for baking. This is due, firstly, to the fact that this cake was originally conceived as a round product, and secondly, it can be removed from a mold of this type without damaging the product, simply by spreading the clamps.
The red velvet sponge cake is baked in the oven at a fairly high temperature - 180 degrees. Pour half of the prepared dough into the prepared pan and place it in a well-heated oven for 25 minutes. The same should be done with the remaining half. As soon as both cake layers are ready, you need to put them in the refrigerator for 3-4 hours, pouring the pre-prepared red velvet cake mixture over them.
Stage 4. Assembling the cake
After all the steps have been completed and the cakes have stood for the required time in the refrigerator, it’s time to start assembling the cake. To do this, take the prepared sponge cake for the Red Velvet cake and coat it on all sides with thick cream, which can be prepared while the cakes are in the refrigerator. As professional chefs recommend, there should be a lot of cream on this dessert.
Once the cake is formed, it can be decorated with various cream products that can be squeezed out of the bag. If desired, you can sprinkle it with chocolate chips. After all this, you should send the confectionery product to a cool place for some time to infuse. The ideal option would be for him to stay in such a place for 8-10 hours.
Ingredients for making cream

Technology for preparing cake cream
The ideal cream for such a cake is one that has no lumps and has a pleasant creamy taste. Properly prepared cream is the key to a delicious cake in the end.
In order for the mass to turn out the way it should be, you should take cream cheese and butter, combine them in one bowl and beat them thoroughly using a mixer. For this purpose, you can use a higher speed of the machine, which cannot be done during the dough preparation process.
After the creamy mass becomes homogeneous, you need to add vanilla sugar and powder to it and then beat again until completely homogeneous. As culinary experts note, the correct cream should have a very thick consistency so that a spoon lowered into it does not change its specified position.

Another recipe for sponge cake for red velvet cake
This version of the recipe for this product, unlike the previous one, is not classic, but is also quite simple to implement. This is just another easy option on how to make red velvet cake.
In order for it to turn out to be the correct consistency, and the end result is an original and tasty delicacy, you need to take five eggs and combine them with 500 g of granulated sugar. These ingredients should be thoroughly beaten and set aside. Now is the time to start making the liquid base of the cake.
In order to make the base for the dough, you need to take 400 g of kefir and a small amount of soda (it does not need to be quenched with vinegar, since the fermented milk product itself has an acidic environment). Next, you need to add food coloring to the total mass, which in bulk form will require about 30-40 g and a couple of glasses of vegetable oil. When choosing oil, you should pay attention to the fact that it is refined (odorless), otherwise the taste and aroma of the finished product will be greatly spoiled.
Now you can start creating the dough. To do this, sift 650 g of wheat flour, add a small amount of cocoa powder (about 2 tablespoons), as well as a small amount of salt. After mixing, the bulk mixture should be added to the beaten egg mass, and colored kefir should also be added there. In this composition, the ingredients should be thoroughly beaten using a mixer until a homogeneous mass is formed. The dough is ready.
In all other respects, the process of preparing a sponge cake is similar to that described above: each cake should be baked in the oven at 180 degrees for 25 minutes. You can always check the readiness of the product with a toothpick.
Impregnation of the cake
As you know, almost all confectionery products require impregnation. As for the recipe for red velvet sponge cake, many of them do not talk about such an element at all. This feature is due to the fact that the cake ultimately turns out to be quite juicy, which is due to the use of a large amount of kefir in the process of preparing the dough for it.
However, as you know, impregnation has not yet harmed any cake, so at home you can make the cake more juicy. For this, the housewife has the right to use any syrup.

How to replace the dye
If there is no red dye in the house or the housewife is against the use of such elements in food, then in this case you can use substitute ingredients. In particular, beet juice can become this, which will not at all spoil the taste of the confectionery product. When using it, you should also take into account the fact that it is not capable of giving such a rich shade as, for example, gel or powder dye, but it will undoubtedly add redness to the cakes.
Some red velvet cake recipes recommend replacing it with cocoa powder if you don't want to use red coloring. In this case, you also get a very original black and white product. When implementing this cooking option, the cake will have a richer chocolate taste than the classic red version, where cocoa is also present among the ingredients.
Nuances in preparation
In the process of preparing such a culinary masterpiece, you should pay attention to some points that can significantly improve or, conversely, worsen its taste.
So, in the process of creating a delicious cream, many chefs recommend adding cream cheese to it as cold as possible. That is, according to the advice of experienced masters, the butter should be kept at room temperature for some time before cooking (so that it is softer), and the cheese should be taken out only before it needs to be sent to the whipping container. In this case, the texture of the cream will be the smoothest and silkiest, which, in fact, is what many are trying to achieve.
As for the taste of the dessert, it has a distant chocolate taste, which is pleasant to most gourmets who adore such a cake. If desired, any cook has the opportunity to enhance it by making a Red Velvet sponge cake with chocolate mousse - for this purpose it is enough to simply increase the amount of cocoa powder that is included in the classic recipe.
During the decorating process, you can also carry out a number of experiments. In particular, for this purpose you can prepare berry or chocolate mousse and decorate the surface of the finished product with it. Many chefs advise using cranberry-based additives, which give the cake a pleasant sourness that goes well with the overall traditional taste. To prepare cranberry mousse, you can grind 350 g of cranberries until pureed and carefully rub them through a fine sieve. Then you should dilute 10-15 g of gelatin with warm water, following the instructions indicated on its bag. After this, you need to create a mixture of 12 g of corn starch and half a glass of sugar, add grated cranberries to it, mix well and cook over low heat, remembering to stir occasionally. As soon as the mixture boils, you need to wait another minute, pour gelatin into it, stir the mixture until all the grains are completely dissolved and cool to room temperature. After such simple manipulations, the finished mass can be poured into a mold, the diameter of which will be equal to the one in which the cake is baked and, covered with cling film, set aside for a while in the refrigerator. Once the cake is ready, you can put this fondant on it.

Indications for storage
As professional chefs note, properly prepared red velvet cake can be stored for quite a long time. In particular, if it is kept in a refrigerator, then its suitability for consumption remains for a week, and if the dessert is frozen, it can be preserved for a month.
Hi all. Very soon February 14th will appear on the calendar. This means it’s time to think about what to give your significant other for Valentine’s Day. I suggest making a gift with your own hands - baking a red velvet cake.
This is a legendary dessert that has won the hearts of millions. It is like no other suitable for decorating your table for Valentine's Day. Bright red cakes and snow-white cream - could there be anything more romantic?!
The red velvet cake recipe came to us from America. However, like the holiday of St. Valentines day. So let's combine these two foreign miracles.
In one of my articles, I already wrote that my acquaintance with home cooking began with this dessert. He captivated me at first sight. The combination of colors, textures and tastes is beyond words, you have to try it.
Today I will share with you a proven recipe for this masterpiece. It must be prepared in advance. I usually bake the cakes the day before the holiday, make the cream in the morning and assemble the cake. By evening, the cakes will already be sufficiently saturated. All that remains is to light the candles and fill the glasses.
As you yourself understand, in order to give such a beautiful shade we need red food coloring. Fortunately, in almost every city there are specialized stores for confectioners, where you can easily purchase everything you need. If you don’t have one, then you can order the dye from an online store, of which there are countless now.
Ingredients:
- flour - 340 gr.
- sugar - 300 gr.
- vegetable oil - 300 gr.
- kefir - 280 gr.
- eggs - 3 pcs.
- cocoa powder - 1 tbsp. l.
- baking powder - 2 tsp.
- soda - 1 tsp.
- salt - a pinch
- red gel dye - 2 tsp.
Preparation:
In a bowl, mix all dry ingredients - flour, cocoa, sugar, soda, baking powder, salt. Flour and cocoa must be sifted.

Next, add all the rest to the dry ingredients - eggs, butter, kefir, gel coloring. I only had 130 grams of kefir in my refrigerator; I replaced the rest with 15% sour cream. The dye I use is Americolor super red.

Mix everything thoroughly. I was too lazy to take out the mixer and mixed everything with a whisk.

Let the dough rest a little - 20-30 minutes. Next, pour into the prepared molds and place in a preheated oven at 170º for 20 minutes.

Since I love soaked cakes, and don’t like cutting cakes at all, I divided this amount of dough into 4 molds with a diameter of 22 cm. At the end, they turned out to be 1-1.5 cm in height. Unfortunately, there was no mold of a smaller diameter. Ideally 16-18 cm. Then your cake will turn out tall.
Regarding the baking time, my first batch took a long time to bake, probably 40 minutes. So you don’t look at the time I stated, but use the dry match test as a guide. The rest of the cakes were baked in about 25 minutes. But I’ll say it again, I have a very bad oven.
Cool the finished cakes first in the pan for 10 minutes, then transfer to a wire rack. On top and on the sides the cake will be more of a chocolate color, but since I am going to completely cover the cake with cream, this is not a problem for me. If you want to make a “naked cake”, then it is better to cut off these places for a brighter contrast.

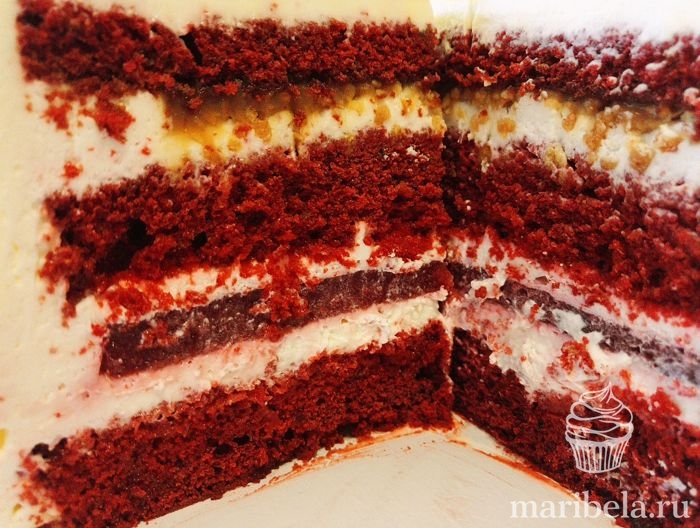
Here in this photo you can see how porous, moist the cakes are inside.

In the classic recipe, the cream for this cake is cream cheese; on my blog there are three versions of this cream -, and. All of them are suitable for this cake. What I want to note is that oil is ideal for leveling. But with cream or Mascarpone - this is a super tasty filling. Choose according to your taste and wallet. Articles will open if you click on them.
Regarding the amount of cream for this cake, you need to prepare 1 kg of cream for a given diameter of filling. That is, if you use a recipe with butter or cream, then this is 2 servings. If with Mascarpone, then one.
To even it out, you will need another portion of cream. To make the cake look beautiful and not have the sides stick out, you need about 500 grams of cream.
In addition to cream cheese, you can also line the cake; it is more affordable, both in terms of ingredients and cost. To level it, you will also need one portion.
It is better to prepare the cream in advance so that it has time to cool and acquire the desired consistency.
Cherries with the addition of cinnamon are ideal as a filling for this cake. In principle, you can put in the layer everything that you have in the kitchen and you like. My favorite filling is lingonberries. I simply boiled it with sugar and added a couple of tablespoons of cornstarch. I didn’t soak the cakes in anything; firstly, they are already quite moist, and secondly, juice will be released from the lingonberries, which will give a little additional moisture.
In addition to berry confiture, dense fillings, such as compote, with the addition of gelling agents - gelatin or agar, can also be used as a filling. The way to work with them is slightly different. They are laid out on the cream and covered with cream on top too. You can see about these fillings here -. And this is what the cut looks like with this filling.
Assembling the cake.
Place a spoonful of cream on a plate so that the cake sticks a little and makes it easier to continue working.


On top there is cream, I used a disposable pastry bag, if you don’t have one, you can put the cream in a bag, cut off the tip and do the same.

Next again the cake - filling - cream - cake. When you lay out the cake, you need to press it down a little so that the filling and cream are evenly distributed. You can put a weight on top for a more even result, but I didn’t bother so much.
My fourth cake did not survive until the morning; it went to our bowls in the evening. That's why my cake consisted of 3 layers.
I put this design in the refrigerator for a couple of hours so that the filling would set.
Then I started leveling the cake with cream. First I applied the first - rough coat. I have a special spatula. Previously, I made it with a spatula (silicone spatula), you can use it if you don’t have a spatula. With the first layer we fill the voids between the cakes and “glue” all the crumbs so that they do not get on the final finish. Place in the cold for about an hour for the cream to set.


We do this several times until the desired result. We decorate the top at your discretion. Since I have a thematic article about a DIY cake for Valentine’s Day as a gift, I simply laid out a pomegranate in the shape of a heart. This is what happened to me.

Here's what it looks like in cross-section.

Agree, it’s hard to refuse such a dessert.
Bon appetit!
Articles on the topic