Let's learn how to make cheese baskets for salads. Salad in amazing cheese baskets Cheese baskets for salads
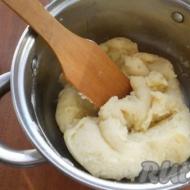
Grate the cheese on a fine grater.
Spread a thin layer of cheese onto a dry non-stick frying pan.
Heat a frying pan with cheese over low heat.
As soon as the cheese begins to melt, remove the pan from the heat.

Cool the bottom of the pan slightly (to do this, wipe the bottom with a sponge dipped in cold water, or place the pan on a cold surface).
As soon as the cheese cake has cooled slightly, carefully place a wide spatula under it and remove the cake from the pan (you don’t have to use a spatula, but remove the cake with your hands).
Place the cheese cake in a shallow cupcake or muffin tin greased with vegetable oil (or in a shallow bowl) and gently press the cake with the bottom of a glass of suitable diameter (or any other object).
Prepare the remaining baskets in this manner.

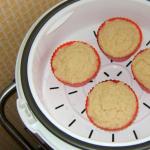
Place the molds with the flatbreads in the refrigerator for ~20 minutes and cool well.
Carefully remove the finished baskets from the molds.

Fill cheese baskets with salad just before serving.
For seafood salad.
Wash and dry the tomatoes.
Cut the tomatoes into large cubes (cut the cherry tomatoes into halves or quarters).
Wash the cucumbers, dry and cut into half rings or quarter rings.
Wash the salad, dry it and tear it coarsely with your hands.
Thaw seafood and rinse well.
Advice. This recipe uses boiled-frozen seafood, so you don’t need to cook it much, but it is advisable for the seafood to absorb the taste of the spicy broth.
Remove the beards from the mussels.
Cut the squid into strips.

Prepare spicy decoction.
Heat a small amount of water in a saucepan, put a couple of sprigs of dill or parsley, bay leaf, 3-4 allspice peas, and salt into the water.
Bring water with herbs to a boil and boil for ~5 minutes.
Place seafood in a spicy broth, bring to a boil and, as soon as the broth boils, turn off the heat, cover with a lid and let stand for ~1-2 minutes.
Place the seafood in a colander and let the broth drain well.
Combine seafood, tomatoes, cucumbers, lettuce in a bowl (if desired, you can add finely chopped garlic cloves and dill or parsley to the salad).
Add salt, freshly ground pepper, lemon juice and olive or vegetable oil to taste.
Mix the salad.

First of all, you need to make a salad basket. Preheat the oven at 180 degrees. Use a flavorful cheese, such as Parmesan, or a similar variety. Grate it using a fine mesh grater.
Cover a baking sheet with parchment or foil and spread the grated cheese into a circle with a diameter of 10–15 cm in a thin layer. Make a test base for the basket to check how the cheese fries. The cheese should melt quickly and not spread, the workpiece should not be too thin and transparent, and also do not make the workpiece too thick.

Place the baskets in the oven. Wait until the edges begin to brown a little. The cheese should melt, but not burn, after which the pieces can be removed from the oven.

Leave the cakes to cool for a couple of minutes, wait until the cheese stops burning your hands and you can carefully remove the cheese cake from the parchment.

Start forming baskets using narrow glasses or tall shot glasses. Turn the container upside down and cover with a flat cake, pinch its edges, giving it a wavy shape. Place in the refrigerator for 10-15 minutes to cool; after cooling, their shape should be fixed and the baskets should become firm.

Salad in cheese baskets with crab sticks will require the preparation of the remaining ingredients.

Cut the boiled chicken eggs into small cubes or grind them on a grater. Quail eggs cut into quarters will look beautiful in this recipe.

Boiled and frozen octopuses are easy to defrost. If cooked for a long time, they will become very hard and rubbery. But to add flavor, it is better to blanch them in boiling water with the addition of a sprig of dill and lemon zest.

Cut crab sticks and octopus into thin strips.

Place the chopped seafood and boiled chopped eggs into a deep bowl. For a richer flavor, grate some cheese into the salad.

Season the mixture with mayonnaise. Store bought will do, but if you have time, make mayonnaise sauce at home.

Remove the cooled baskets from the molds.

Carefully place a couple of spoonfuls of lettuce into each cheese basket. Decorate the dish with herbs and serve.

- To prepare this salad, choose high-quality cheese; it should not break, bubble or spread during the melting process.
- Perfect fillings include shrimp with cucumber, boiled beef tongue with cherry tomatoes, salmon with soft cheese.
- Do not overheat the oven; the base for the baskets should become soft, but not burnt.
- Use aromatic seasonal herbs or chopped vegetables for decoration. Parsley leaves and green onions cut diagonally will look great.

Cheese baskets are made mainly from hard varieties of cheese, which have the ability to quickly harden and hold their shape. It can be Parmesan, Cantal, Soviet, cheddar, Poshekhonsky, Kostroma variety, etc. They differ significantly from each other in taste. In order to please guests, it is better to choose cheese with a medium salt content. Also pay attention to the fat content of the cheese, since a variety that is too fatty will result in high-calorie baskets.
How to prepare a cheese basket for salads:
To make cheese baskets, you will need a flat pan on which to melt the cheese. Use a plate if you plan to microwave the product, or a small oven-safe skillet.
Grease the mold with butter and grate the cheese on a fine grater so that no crumbs or small pieces form.
Next, distribute it across the plate so that there is more cheese mass in the center and less at the edges. You will get a container with a dense bottom and thin edges. Please note that the diameter of the dish is the size of the future basket. Therefore, it is better to decide on this in advance.
Place the plate in the microwave or the frying pan in a preheated oven and wait for the cheese to melt.
When you hear a characteristic crackling sound, this will mean that the cheese has melted to the required consistency. After this, very carefully lift the cheese pancake with a spatula and place it on a glass or cup.
The edges of the resulting mass should sag on the sides. While the cheese has not yet hardened, it is necessary to form the sides of the basket.
This can be done using a regular fork or special devices that help create a beautiful relief.
Remove the resulting form and place it in the refrigerator to further harden. You can add sesame seeds, dill, any herbs and greens to your taste. This will add sophistication to your appetizer.
How to fill a cheese basket
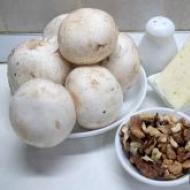
When the cheese baskets are ready, you should think about the filling. There are a lot of options. If you are a seafood lover, then do cocktail of mussels, shrimp and squid, sprinkling them with lemon juice. You can also do salad from any type of meat and tomato. Cheese goes well with some fruits or nuts. For example, if you fill a cheese basket grapes, pear and add walnuts , then guests will appreciate such a treat. The filling will be delicious mushrooms with fried onions and buckwheat. You can experiment endlessly. However, do not forget that the filling should not be wet. Otherwise, the cheese will begin to spread and lose its shape. It is better to lay out the filling immediately before serving and store the dish in the refrigerator. Cheese baskets are great not only for adults, but also for children's tables, as children like unusual ways to decorate dishes. If you have extra baskets left, you can leave them in the freezer and use them next time.
When preparing to host guests, every housewife is concerned not only with creating a menu and preparing dishes, but also with how to decorate them most effectively. After all, beautiful table setting and festive table decoration is one of the ways to express your respect for your guests.
Traditionally, salads are served. Of course, this appetizer can be placed in one large salad bowl, but one of the most effective ways to serve it is in portions. The salad can be placed in small glass, porcelain or ceramic salad bowls or served in tartlets, which are sold in many stores today. And there is another rather spectacular and unconventional option - serve the salad in a cheese basket. In addition to the fact that such a serving of appetizers will greatly decorate the table, there is another advantage - the taste of the salad is complemented by the taste of fried cheese.
The question may arise, what kind of salad can be served in cheese baskets? Yes, almost anyone! In addition, other appetizers can be served this way, for example, mixed seafood or julienne. The main thing is that what you are going to put in the cheese basket is not too liquid.
It should be noted that making beautiful cheese baskets is not so easy. Therefore, you need to practice a little before you start preparing the festive salad frame. But you can prepare these cheese salad baskets the day before. Then carefully place them in a container with a lid and put them in the refrigerator. And you need to fill the cheese baskets with salad immediately before serving.
So, let's try to make this delicious decoration. For example, we need Parmesan. But you can also use regular cheese, but you need to let it air out a little and dry in the refrigerator. The cheese should be grated, and it is desirable that it does not crumble in the process, but forms thin translucent slices. In this case, our cheese baskets will be more beautiful.
It is most convenient to use a frying pan with a non-stick coating to prepare the baskets. It needs to be greased with a thin layer of vegetable oil and heated over a fire. Pour into a heated frying pan (about two tablespoons per basket). It is advisable that there be more cheese in the middle of the resulting cake than at the edges, then our basket will have a thick bottom and openwork edges.
Fry the cheese “pancake” for five to seven seconds until it begins to brown at the edges. Then remove the frying pan from the heat and place it on a towel lightly moistened with cold water (this way we will cool the cake slightly). Now very carefully lift the pancake with a spatula and place it on an inverted glass or cup. Press the edges of the cake against the walls of the vessel using a paper towel. This way we will give the basket a shape and at the same time remove excess fat. Let the cheese cool without removing it from the mold. That's it - the cheese basket is ready.
As you can see, preparing it is a little difficult, and it can take a lot of time, especially if a lot of guests are expected.
It must be said that cheese baskets can be prepared with different additives. For example, if you mix cheese with finely chopped dill, the baskets will turn out mottled, with green splashes. You can add toasted sesame seeds to it, then the baskets will turn out crispy. And lovers of a spicy taste can use chopped garlic as an additional ingredient.
If you want to make denser baskets, you can add a little starch to the cheese. For two hundred grams you need to take a full heaped tablespoon of potato or corn starch.
In short, a little practice - and you can pleasantly surprise your guests by serving salad in cheese baskets. Surely, such a dish will create a sensation, and the hostess will receive many compliments about her culinary skills.
Articles on the topic