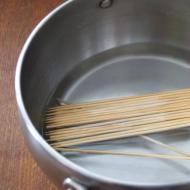
The easiest recipe for chess cookies. Checkerboard shortbread from Le Cordon Bleu. The best chess cookies. Step by step recipe
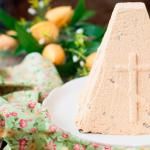
Checkerboard cookies
Despite the apparent complexity, preparing chess cookies according to this recipe couldn’t be easier. Moreover, the originality of the execution of this baked goods can amaze all relatives and friends.
In addition, such an interesting dessert can decorate absolutely any holiday table. After all, it is not at all necessary to show your guests all the intricacies of cooking - let them think that you spent half a day in the kitchen cooking.
The base is a simple vanilla dough. At the same time, the result looks very unusual, pleases the eye and goes wonderfully with morning coffee.
Flour - 280 g (+ a little more)
Baking powder - 1/2 tsp.
Salt - 1/2 tsp.
Butter - 225 g (softened)
Sugar (or powder) ~ 180-190 g
Eggs - 1 piece
Cocoa powder - 60 ml (~30 g)
Vanilla extract - 1/2 tsp. (I, as usual, replaced some of the sugar with vanilla powdered sugar)
Oven - somewhere at 180-200 degrees. (usually 180 is found, but personally I had to raise it higher)
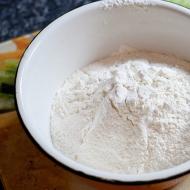
Sift together dry ingredients: flour, salt, baking powder.

Beat the softened butter well with a mixer with sugar/powder.

Add the egg. Beat well again. Add the dry ingredients and stir well (I do this in two stages, stirring with a mixer).
Divide the dough into two equal parts. Stir cocoa into one. If necessary, add a little flour.
Divide each part in half again. Roll out each of the four parts (or make something flat out of it with your hands), wrap it in film and put it in the refrigerator. An hour should be enough... two is better) I left it overnight.

Take one white part and roll it into a rectangle. The thickness of the dough is 1 cm, the narrow side is 10 cm, the wide side is as it turns out.
The thickness can be varied. The idea is to then cut out nine square strips of dough. That is, the narrow side is the thickness of the dough nine times + one more time for scraps.
Place back in the refrigerator to cool. This is not necessary, but the more you chill the dough in the intermediate stages, the smoother the pattern will be.
Do the same with one piece of chocolate dough.

Cut nine strips 1 cm wide from one light and one dark piece.

Carefully fold them into two bars of 9 strips, placing the strips in a checkerboard pattern. You will get two versions of the drawing.
Wrap the bars in film, carefully compact them (make them smoother and “squarer”) with something flat (I used small cutting boards).
Place in the refrigerator.

Remove one of the remaining pieces of dough. For example, light.
Roll it out so that it is a little larger than we did before in width and length. The thickness of the dough layer can be any... the main thing is that the dough is rolled out evenly. It’s better to roll out on baking paper or cling film... it will be easier to wrap later.
Remove from the refrigerator the composite block that contains more dark dough. Using baking paper (film), carefully wrap it in a light layer.
The main thing is not to rush... the dough breaks. Where necessary - trim, cover up. Carefully align the sides, making the corners closer to straight lines. Wrap in film and put in the refrigerator.

Do the same with the dark dough and the second collection block. Wrap in film and put in the refrigerator.
You can also put it in the freezer and store it for up to a month... and when you need it, take it out, cut it and quickly bake it.

Cut the block into squares of equal thickness 7-10mm
At this stage, the better you cool it, the smoother the drawing will be. I cooled the light block for only 15 minutes. This is not enough, and the drawing “floated” a little.

Bake at 180 degrees for about 15 minutes (depending on the thickness of the cookies and the nature of the oven). Visually - to a light blush.

Allow the cookies to cool.. just be careful with them.. at the beginning they are very soft.

The dark block spent 40 minutes in the refrigerator... and it was much easier to work with.

The squares turned out smooth and neat.


Place half the powdered sugar, half the softened butter, and a pinch of salt into the blender bowl. Mix until we get a homogeneous mixture.

Add the egg and 1/2 teaspoon of vanilla essence. To make excellent shortbread chess cookies, you need to mix thoroughly until you get a homogeneous mixture.

Add 50 grams of almond flour and half of the wheat flour. Mix until the ingredients are combined.

Place the resulting dough on film and wrap it around. Place the dough ball to cool for one hour.

Let's prepare the Chess cookies next, and to do this we repeat all the previous steps to prepare the chocolate dough. Don't forget to add cocoa powder before adding flour. We also put it on film, wrap it and put it in the refrigerator for an hour.

The resulting balls of dough for Chess Cookies should yield 2 identical rectangles with the same thickness. This can be easily achieved by using cutting boards as shown in the picture.

We do the same with chocolate dough.

Break the egg into a small bowl and beat very well.

Use a brush to apply the egg onto the vanilla batter. The egg will serve as glue for our Vanilla Chocolate Chess Cookies. Lubricate the entire surface.

Cover the top with chocolate dough and cut off the edges to smooth it out. It should be a rectangle.

Divide the resulting two-layer dough in half. You need to cut quickly and accurately, otherwise the pattern may be uneven.

Grease the top of one half of the dough again.

Place the second half on top, pressing down slightly. We follow the alternation of chocolate and vanilla dough.

Now cut lengthwise. The thickness should be the same as the thickness of the first layers of dough. It is important to try to cut evenly to get an even pattern.

Brush with beaten egg again and fold the dough layer upon layer. We follow the chess order.
Let's prepare vanilla dough for vanilla-chocolate chess cookies. First, the butter must be softened in the microwave, but not melted.
Step 1: Prepare the cookie dough.
Take the butter, well frozen, out of the refrigerator and grind it in one of three ways - cut it into small pieces with a knife, grate it, or cut it into large pieces and beat it in a blender. Add a chicken egg, powdered sugar and a couple of tablespoons of flour to the butter. We continue to beat the mass, or mix it properly to obtain a homogeneous dough. Divide the dough into 2 parts and add cocoa powder to one of them, and vanilla sugar to the other. Remind what happens next need to beat again and mixing both balls of dough will probably be unnecessary. The dough is not quite ready yet - after all, we still have flour, which we will mix in equal parts to both lumps to get an elastic dough that does not stick to our hands. Wrap both doughs in cling film and chill in the refrigerator for about 40 minutes. The butter will harden, and then the dough will be easier to roll out.
 Step 2: Form chess cookies.
 Now the most interesting part of the preparation begins. We take the dough out of the refrigerator and again divide each lump in half. We put one part back in the refrigerator, and roll the second into a small rectangle. The thickness is approximately 1 cm. We cut the rectangle into cubes, which is clearly shown in the photo. The more accurately and evenly you cut the bars, the more beautiful the end result will be. What size your chessboard and the cells in it will be is up to you to decide. My cells are 1x1 cm, and the perimeter itself is approximately 3x3 cm.
  We take out those parts of the dough that have been put in the refrigerator and quickly roll them out into a layer about 5 millimeters thick. We lay multi-colored blocks on it, alternating, so that it looks like chess squares. Determine the number of cubes in one roll yourself; maybe you want to prepare a whole chessboard? We wrap a layer of dough around the cubes and get a roll, which we send back to the refrigerator to cool the butter again. Without cooling, the roll will be difficult to cut, the bars may move out, and this will ruin the design of the future cookies.
 Step 3: Prepare and bake chess cookies.
While the roll is hardening, prepare a baking tray - grease it with a small amount of vegetable oil and line it with parchment paper. Turn on the oven so that it has time to warm up up to 160 degrees. We take the future cookies out of the refrigerator and cut the roll crosswise into slices 6-8 millimeters thick.
  Place the cookies on a baking sheet and put them in a hot oven. Bake the cookies until done, but without letting you blush. 15 minutes should be enough for each serving.
 Step 4: Serve the finished chess cookies.
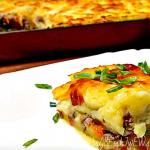
 These amazing cookies are perfect for both hot - tea, coffee, cocoa, and refreshing cold - juice, milk, lemonade, drinks. Serve it warm or cool - whichever you prefer. Its spectacular appearance will surprise your guests, and its amazing taste will be remembered for a long time! Bon appetit!
 To ensure that the cookies are baked but not browned, you need to monitor the baking temperature - the cookies are dried rather than baked.
You can mix different colored dough differently and get a different “color” of cookies.
It is not necessary to add vanilla sugar. You can also use sugar instead of powder, but you will have to beat it for a long time until it completely dissolves.
Tender, crumbly and incredibly tasty shortbread chess cookies - isn’t this the dream of every housewife: to cook and enjoy her baked goods. I love making these shortbread cookies because the recipe is quite interesting and simple. The finished baked goods look original and beautiful: any day can turn into a festive one - the aroma alone lifts your spirits! The taste of homemade chess cookies is simply extraordinary: due to the addition of boiled yolks to the dough. For shortbread cookies, the ingredients used are very affordable, almost all of them are in our refrigerator. A few secrets will help make ordinary baking magical! Today I will tell you how to make chess shortbread cookies: you will definitely succeed too.
Ingredients:
- wheat flour - 240 grams;
- boiled yolk - 3 pieces;
- vanilla sugar - 0.5 teaspoon;
- salt - 2 pinches;
- butter or margarine - 200 grams;
- powdered sugar - 4 tablespoons;
- cocoa - 20 grams.
The best chess cookies. Step by step recipe
- The dough for chess shortbread cookies is prepared using the yolks of boiled eggs, so to begin with, separate the yolks from 3 hard-boiled eggs, and you can eat the whites: they won’t be needed.
- First knead the white vanilla dough. Mash one and a half yolks with a fork.
- Then add 100 grams of soft butter (margarine), 0.5 teaspoon of vanilla sugar (or 1 pinch of vanillin), 1 pinch of salt and 2 tablespoons of powdered sugar. If you add sugar instead of powder, it will be slightly noticeable in the finished cookies.
- We carefully combine everything with a fork, rubbing all the ingredients as much as possible.
- Pour 130 grams of flour into the resulting mass to obtain a homogeneous dough. At first it sticks a lot, but then it doesn’t stick to your hands at all. Don’t knead for too long: it’s enough to come together, otherwise the dough will turn out bad.
- Wrap the resulting dough in film or a bag and put it in the cold for about 20-30 minutes.
- Immediately prepare the dough with cocoa. We also grind 1.5 yolks, add 100 grams of soft butter, powdered sugar - 2 tablespoons, salt - 1 pinch and 20 grams of cocoa. It will taste like chocolate, so we don’t add any flavorings.
- Add flour: you will need 110 grams less than the first dough. Mix until smooth.
- People often ask me: why can’t you make all the dough at once and then mix some of it with cocoa? It is possible, but the consistency of the dough to which you add cocoa will be a little denser than white, and this is not desirable. We also put the dough in the cold so that it cools well.
- Roll out the vanilla dough and immediately form a rectangle or square with the same thickness, about 5-10 millimeters.
- We do the same with chocolate dough.
- Place a chocolate rectangle on the board, with light vanilla on top. The sizes of the two pieces should be the same.
- Place in the freezer for 30-40 minutes. The dough should harden before it can be cut evenly.
- After we cut off the uneven edges, you can then roll them into a sausage and make marble cookies by cutting them into small pieces.
- Divide the rectangle into strips of the same size. I got four pieces. Cut quickly with a very sharp knife.
- Next we make chess cookies. We take two strips and connect them overlapping each other. White stripe to chocolate stripe and vice versa. We also connect the other two.
- Cut into cookies, about five millimeters thick. Everything needs to be done quickly, as the oil in the dough heats up quickly and the cookies may not turn out even.
- Preheat the oven to 200 degrees. Cover the sheet with baking paper.
- Lay out the cookies and bake for about 15-20 minutes: they should not be too toasted.
Tender and crumbly cookies are ready for tea! Be sure to make these shortbread cookies: your loved ones will definitely be pleased! This homemade chess cookie recipe is the best and most successful for me! Cook with me on the “Food for Every Taste” channel and the “Very Tasty” website: we have something to offer you. I wish you culinary achievements, delicious pastries and a great mood. Bon appetit!
I found the recipe for these cookies in the book of my beloved James Peterson, “Baking,” who has repeatedly delighted me with his excellent ideas and detailed instructions for preparing this or that dish. Not only does it look pretty sophisticated (almost everyone who sees it starts twirling these cookies in their hands and wondering “how is this made???”), but it’s also very, very tasty. I have not yet seen a single person who would limit himself to one single thing.
Unfortunately, now almost all cookies sold in stores are prepared using margarine in order to reduce the cost of production. This means that the cookies do not taste the same, and they contain a huge amount of trans fats, which are harmful to the human body. Cookies made with real butter cannot be found everywhere and they cost a lot of money (200 rubles per 100 g). That is why for myself and my family I prefer to prepare delicious and healthy treats with my own hands from the best products.
You will need (light dough):
- 2 cups of flour
- ½ tsp salt
- 1 cup of sugar
- 220 g chilled butter, cut into 1x1 cm cubes.
- 1 egg
- 1 egg yolk (+ 1 more yolk if necessary)
1. Mix all dry ingredients in a cup (flour, sugar, salt). Add the diced cold butter and use your hands or a mixer to mix everything together until the mixture resembles grated Parmesan cheese.
2. Add the egg and egg yolk and continue stirring until the mixture comes together into one large ball. If necessary, if the mixture is too dry and the dough does not stick together, add 1 more egg yolk.
3. Roll the dough into a ball and put it in the refrigerator for 30 minutes.

You will need (chocolate dough):
- ¾ cup flour
- 1/3 cup sugar
- ¼ cup cocoa powder (no sugar!)
- ¼ tsp salt
- 60 g chilled butter, cut into 1x1 cm cubes + 2 more tbsp.
- 1 egg white
1. Mix all dry ingredients in a cup (flour, sugar, salt, cocoa powder).
2. Add the diced cold butter and egg white, mix everything until the dough forms one large ball.
3. Place in the refrigerator for 30 minutes.
How to make chess cookies:
Powdered sugar
- 1 egg white, beat
1. Divide the light dough into 4 parts, from each form several ropes 1-1.5 cm thick. Roll out the dough on a table dusted with powdered sugar and use your hands. The warmth of your hands will make the dough more pliable and you will be able to roll it out carefully without damaging it. Do the same with the chocolate dough.

2. Place alternately light and chocolate strands next to each other in a row of 4 pieces. Gently press them on the sides with a knife, and on top you can lightly walk over them with a rolling pin.
3. Complete the next row in the same way, but place the strands in the opposite order (that is, if in the previous version you started placing them in a row with a light strand, this time start with a dark one).

4. Brush the first row of strands with beaten egg white and place the second row of strands on top of it.
5. Repeat steps 1-3. In total, you should have 4 rows of bundles, arranged in a checkerboard pattern (see photo). Place your design in the freezer for 15-20 minutes.

6. Preheat the oven to 180 C.
7. Using a sharp knife, carefully, being careful not to bruise, cut the dough into cookies 0.5 cm thick. Place them on a baking sheet lined with baking paper and bake for 12-15 minutes (the edges of the cookies should begin to brown).
Simpler variations on the theme of the “light-dark” combination are possible, such as “spirals” (glue together two layers of dough using egg white, roll them tightly into a roll, put them in the refrigerator for 30 minutes, cut, bake) or “coins” ” (a dark rope inside a light dough rolled into a roll.
Articles on the topic